My 5-Step Plan to Organise Your Digital Photos Once and For All

If your digital photos are spread across multiple devices, backed up in three different cloud accounts (you think), and buried in folders named “DCIM_8721,” you’re not alone.
Most of us take more photos than we know what to do with — and organising them keeps slipping down the to-do list. But here’s the good news: you only need to do the hard bit once.
This is the system I created to finally get my digital photos in order. It’s practical, not perfect. And it works.
Step 1: Set Up Your Storage Systems
Before you sort a single photo, get your digital filing cabinet in place. You need two reliable storage methods:
✅ An external hard drive – I recommend a 1TB drive like Seagate (around £50).
✅ A cloud storage solution – My pick is Amazon Photos (free unlimited storage for Prime members), but iCloud or Google Photos also work well.
🔁 Why both? If one fails, the other is your backup. Relying on just one isn’t worth the risk.
Action:
Buy a hard drive
Choose and set up your cloud storage
Step 2: Create a Clear Folder Structure
The easiest way to stay on top of things? Keep it simple.
Here’s a structure I use:
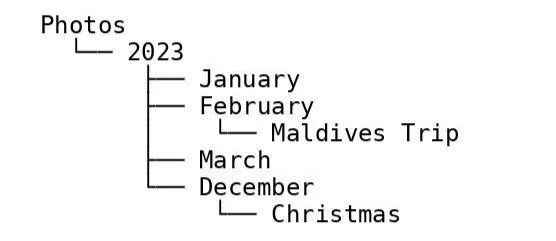
This lets you find photos easily and avoids the dreaded "miscellaneous" folder.
Action:
Create a top-level folder for your photos
Inside that, create folders for each year
Add monthly subfolders (and extras for special events)
Step 3: Consolidate and Declutter
Now for the hard bit — but don’t skip it. This is where the real transformation happens.
You’ll move everything to your external hard drive and sort as you go. Work in batches.
🧹 What to do as you go:
Remove duplicates
Delete blurry or useless photos
Sort good ones into your folder structure
Delete the originals from your computer/devices
Empty the recycle bin!
📍 Don't forget to include:
Photos from cloud storage (like iCloud or Google Photos)
Old USBs, SD cards, or CDs
Scanned prints from dusty photo boxes
Action:
Methodically transfer and sort ALL your photos
Delete them from their original locations once done
Optional: recycle physical CDs and photo prints
Step 4: Upload to the Cloud
Once your hard drive holds your complete, curated collection, it's time to upload your photos to the cloud.
📦 Don’t rush — upload year by year, and confirm each batch is complete before moving on.
💡 Tip: Some platforms (like Amazon Photos) let you create albums by year. This can make browsing easier than relying on metadata alone.
Action:
Purchase the storage you need
Upload your sorted folders to the cloud
Step 5: Maintain With a Monthly Check-In
Now that everything’s neat and tidy, don’t let the monster return. A quick monthly check is all it takes:
📅 Monthly photo checklist:
Delete unwanted photos from your phone
Transfer good ones to your hard drive
Upload them to your cloud storage
Delete from phone and computer (and empty the bin!)
It takes 10 minutes tops, and your future self will thank you. Click here for a more detailed explanation of the Monthly Check-In.
Final Thoughts
Organising years of digital chaos can feel overwhelming — but doing it once, thoroughly and properly, will save you countless hours in the future.
It’s not about perfection. It’s about creating a system that works and putting it on autopilot.
Ready to tame the photo monster once and for all? Your hard drive is waiting.